published: July 10, 2019 —
last modified: October 23, 2025
After writing the article about event-based firmware, I realised there are some misunderstandings about how real-time counters are working and should be used. Especially there is a misconception about an imagined problem if such a counter overflows. In this article, I try to explain this topic in more detail, using an example code for the Arduino IDE.
Table of Contents
What is a Real-Time Counter?
A real-time counter is a variable or register which increases at a given time interval. The term real-time may be confusing. It just states the fact this counter ideally does count independently of any other parts of the firmware. Therefore, even if the main code stops at one point and waits for a specific condition, the real-time counter will get increased in the “background” at the given interval.
How is the Real-Time Counter Implemented?
These counters are usually implemented using a hardware timer and an interrupt. For the Arduino platform, a hardware timer is set to create an interrupt for each millisecond. If you can find most of this code in the file wired.c (AVR) or delay.c (SAMD). The following code is a summary of the relevant parts of the simpler implementation for the SAMD platform:
There is the variable _ulTickCount which is an unsigned 32bit integer. It is marked volatile to tell the compiler, this variable can be modified from an interrupt and reads can not be optimised away.
You access the current value using the millis() function. Interrupts do not need to be blocked while reading this value, because reading a single 32bit value is an atomic operation for the SAMD platform. It means, it is not possible to process an interrupt in the middle of reading the integer. The interrupt will occur before or after reading the value, but never e.g. after reading the first byte of the integer value. For some platforms, this can be a problem.
The last function is SysTick_DefaultHandler which just increases the variable by one, every millisecond.
What is Integer Overflow?
An integer overflow happens, if you add to an integer value and the result exceeds the maximum number it can store. You can easily verify this using the following code:
There are some misunderstandings of how integer overflow is working:
Integer overflow is a low-level behaviour of processors and not all programming languages behave this way. E.g. Python or Swift handle these cases in a special way.
Overflow happens not just in one direction. It is a fundamental principle of how processors are doing math. It happens with additions, subtractions but also affects multiplications and divisions.
While the C and C++ standard defines the overflow behaviour of unsigned integers, the behaviour of signed integers is , the behaviour of signed integers is undefined. It is important you never assume, signed integers wrap over in the same way unsigned ones do.. It is important you never assume, signed integers wrap over in the same way unsigned ones do.
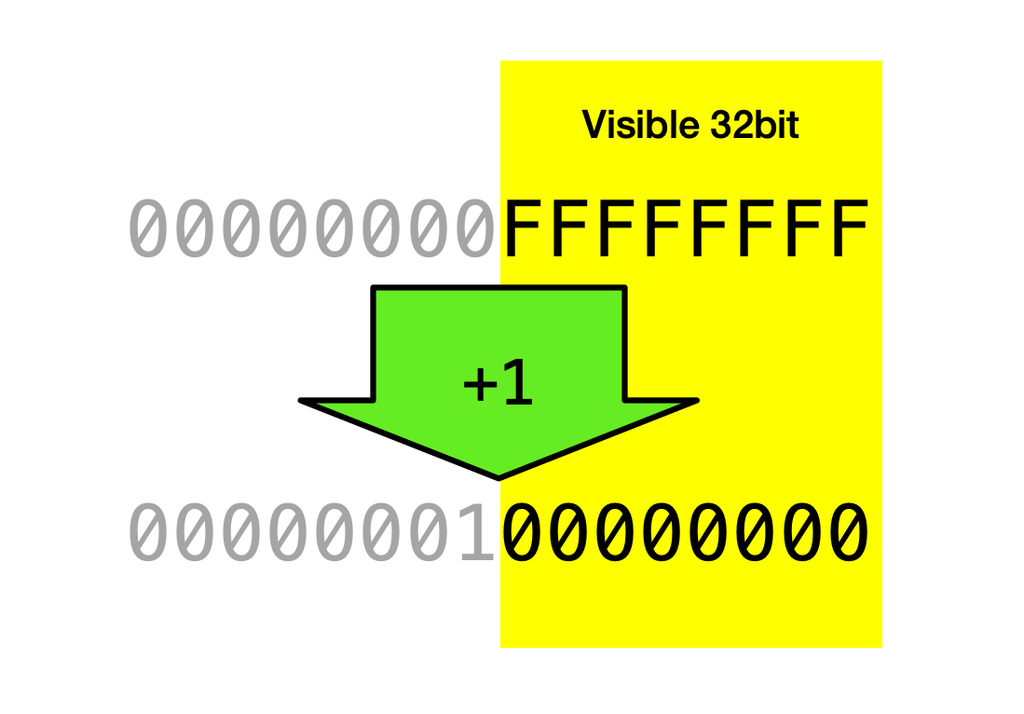
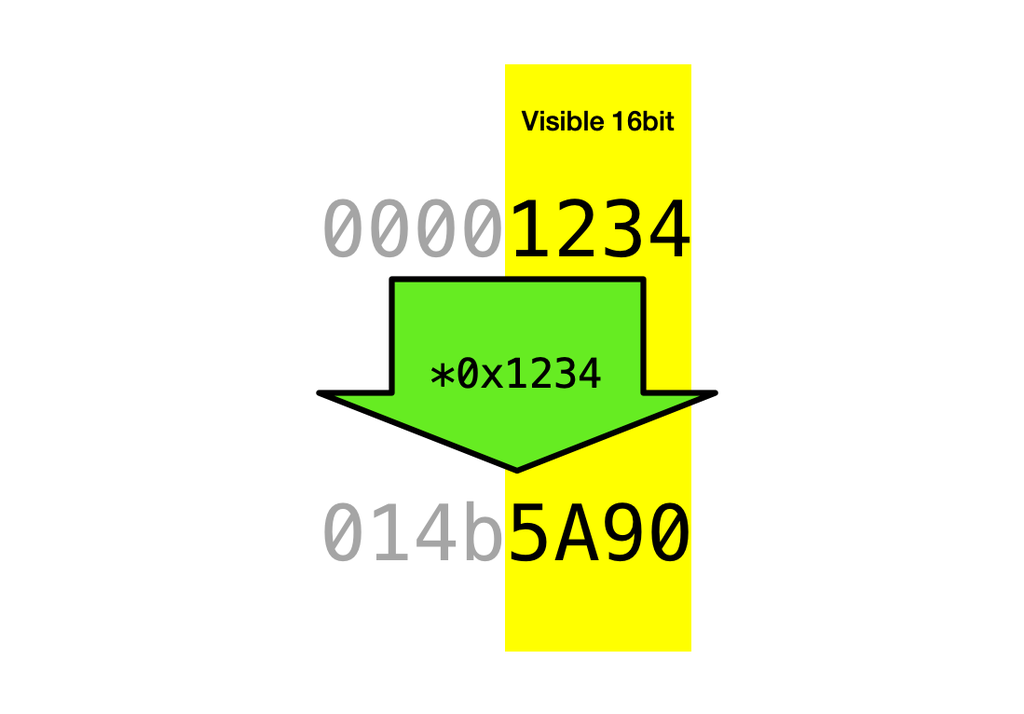
Just imagine, you see the least significant part of a larger value:
The grey part on the left does not exist. It just explains the principle of the operation. On the CPU level, only one bit of the grey part is kept in the form of an overflow or carry bit. This bit can be used to chain multiple additions to work with larger numbers. In most programming languages, you can not access this overflow or carry bit directly.
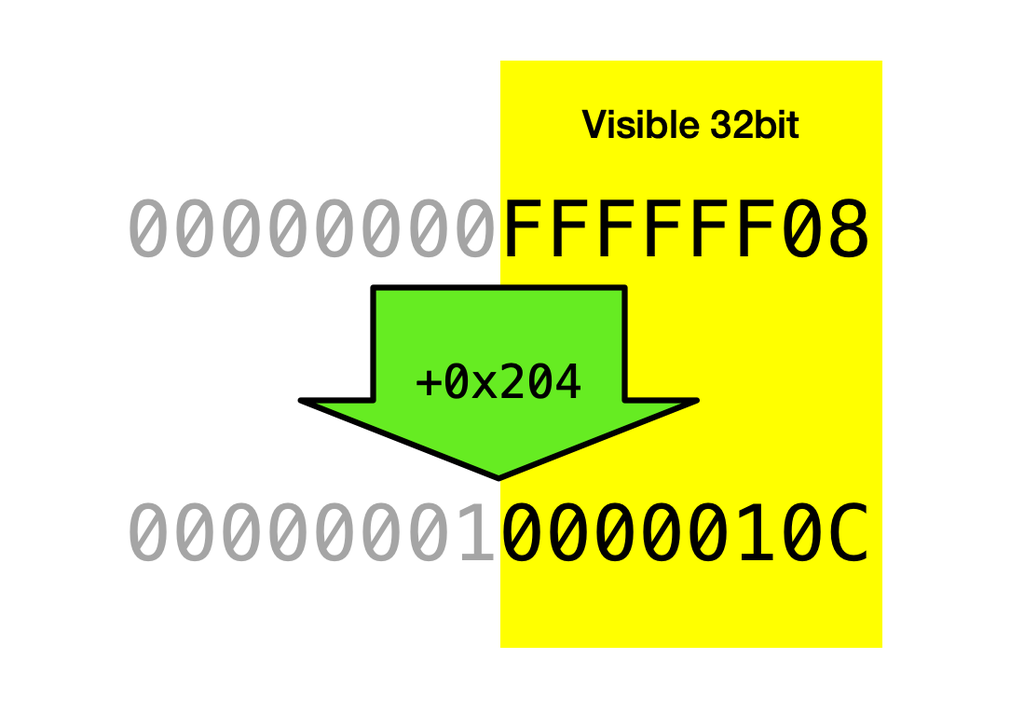
While most people easily understand the transition from the last possible value back to zero, it works similarly with any operation:
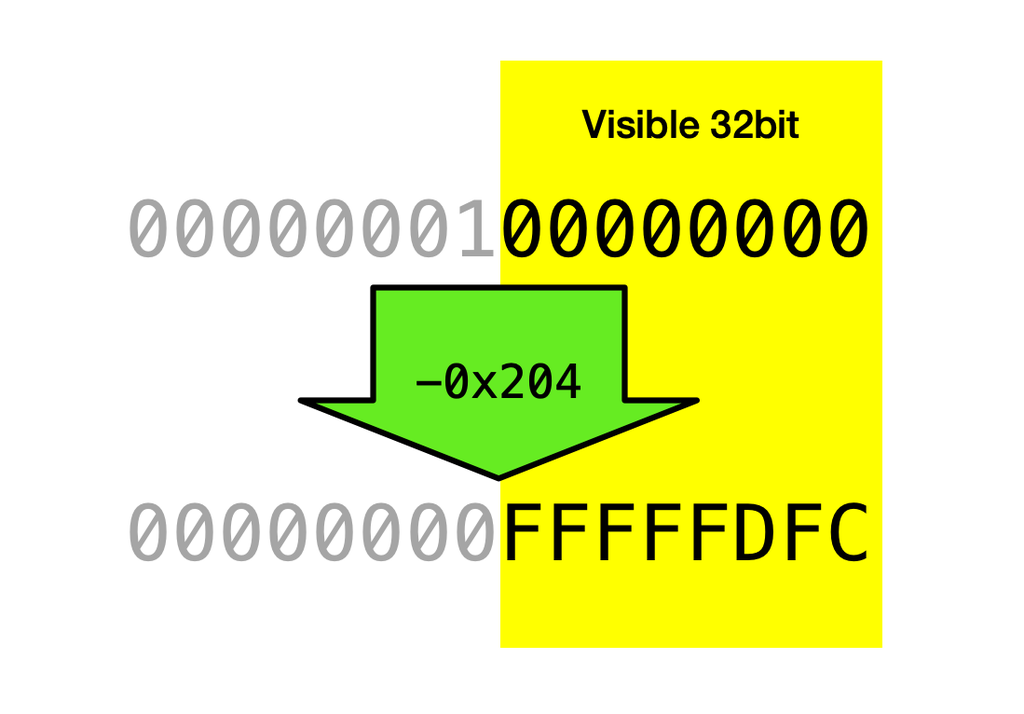
Subtractions are no exception. The overflow happens oppositely:
Multiplication is no exception, have a look at the following code example:
So, why 0x1234 multiplied by 0x1234 equals 0x5a90? The explanation is very simple:
For mathematicians, this is troubling and often leads to mistakes, but if this is understood correctly, it simplifies many calculations.
The Real-Time Counter as Relative Time
Often real-time counters are set to zero at the start of the firmware. This leads to the wrong assumption, it counts absolute time. Similar to the time counter after the launch of a rocket or a date/time value.
If you use a 32bit counter and use a one-millisecond precision, it only counts for approximate 1193 hours or 50 days. In this context, precision means, the counter is increased once per millisecond. Many hardware projects will run more than 50 days, so there is confusion about what happens if the real-time counter overflows and starts over at zero.
It is essential to think of these counters as relative time. Imagine this counter will not start at zero at the beginning of the firmware. Imagine the counter will start with a random value you do not know.
The actual absolute value of a real-time counter is meaningless, and you should never use an absolute value directly.
Points in Time
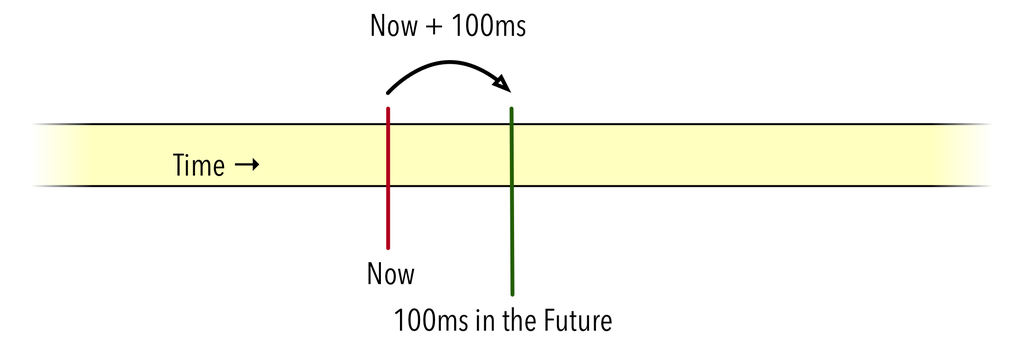
The best is to think of points in time. To find a point in time, you have to calculate them relative to the current time:
This program is using the function millis() which is the real-time counter for the Arduino platform. It will always return the current relative time in milliseconds.
First I calculate a point in time in the future using the expression millis() + 1000 and assign it to next. After turning on the LED, I will simply wait until this point in time was reached.
Using a direct comparison != is not ideal, what happens if an interrupt would take more than a few milliseconds and while would miss this expected millisecond?
This loop would block for the full 50 days until this same value reappears again. With a bit of luck, the comparison would match this second time. Therefore, using a direct comparison is a bad idea. While it is working in example programs, you should never use this in production code.
Test if the Time Expired
A much better approach is to test if the calculated time has expired. It is precisely the point where many developers make a fatal mistake. They will write code like this:
At first glance, this code looks good. And assuming the real-time counter will start at zero, this example code will work as expected.
As long as millis() is less than the chosen point in time, the while loop will wait. The fatal assumption here is the real-time counter value will increase indefinitely. You assume, the real-time counter is an absolute time, which is wrong!
There is a chance the real-time counter was already near its end. Adding the 100ms to the value will overflow, and you will end with a lower value as before. If you think of the value as absolute time, this can lead to horrible results.
It is precisely this particular case that worries many developers. They talk about a special case and how to prevent problems caused by it.
Yet, it is only a special case if you think in absolute time. If you correctly think in relative time, there is no special case.
The Time Delta for Comparison
To correctly verify if a point in time has expired, you always have to calculate the delta between this point in time and the current time. Calculating the delta between these time points is a simple subtraction:
autodelta=next-millis();
Here comes the next topic which is often misunderstood. Calculating a delta using unsigned values will not produce the expected results.
As you can see, as soon the current time is after the time point, the subtraction will overflow, and you get high values. For this example, I use 16bit values, but the principle is the same for any size of unsigned integers.
To test for an expired value, you can use several techniques, but most just split the whole time range in half. You simply check if the result is higher than the middle of your value to assume you got a negative result. Therefore the current time has passed the chosen point in time.
constuint8_tcOrangeLedPin=13;boolhasExpired(uint32_ttimePoint){// not perfect
constautodelta=timePoint-millis();returndelta>0x80000000u||delta==0;}voidsetup(){pinMode(cOrangeLedPin,OUTPUT);autonext=millis()+1000;digitalWrite(cOrangeLedPin,HIGH);while(!hasExpired(next)){}digitalWrite(cOrangeLedPin,LOW);}voidloop(){}
You may also check for the highest bit in the value:
boolhasExpired(uint32_ttimePoint){// not perfect
constautodelta=timePoint-millis();return((delta&0x80000000u)!=0)||delta==0;}
Highest bit? Isn’t this how signed integers work? If the highest bit in a signed integer is set, it indicates a negative value. Therefore, if you convert an unsigned integer after a subtraction into a signed one, you get the correct negative results as you would expect.
There is no difference between the subtraction of signed or unsigned integers on the binary level. It is just the representation of the value, which is different. Let us test this with our previous example:
As you can see, the delta values are exactly the same as for the previous run. There is no special case. You can run the example program with any start value for the current time, and you will get the same results.
Summary
The correct way to work with real-time counters is by consequently thinking about them as relative time. Not only calculating a point in time has to be relative, but also the comparison has to in relative time using a delta.
Overflow is no problem, instead, it is beneficial to write very compact code.
The overflow behaviour of **signed integers **is undefined in C and C++, only use unsigned integers for counters if you rely on the wrap over behaviour.
The correct way to calculate points in time is by adding to the current time value: currentTime + delay.
The correct way to check for expired points in time is using a delta: static_cast⟨int32_t⟩(timePoint - currentTime) <=0
Limitations and Time Delta Maximum
The size and precision of the counter define the maximum time delta you can safely measure. The following table describes different bit sizes and the maximum time delta:
Bits
Precision
Duration
Time Delta Maximum
8
1ms
256 ms
128 ms
16
1ms
65 s
33 s
24
1ms
4.6 h
2.3 h
32
1ms
50 days
24 days
64
1ms
584'554'049 years
292'277'024 years
Using a Fraction of the Counter
If you have memory constraints and do not need time deltas in the day range, but in the second range, use a fraction of the real-time counter:
Because you use relative time, it does not matter if you use a lower number of bits of the counter.
What if I Need Precise Timing?
If you need very precise timing or measure times on the nanosecond scale, you should consider using a hardware timer and interrupts.
Real-time counters, especially the ones implemented in software, are not very precise. Other interrupts can cause a slight shift or even cause the counter to skip a tick. Another problem is the way to test to a time point in the main program - using e.g. an event loop.
Alternatively, there are dedicated real-time counter chips or built-in real-time counters in certain MCUs. The benefit of using a dedicated hardware counter is independence from the CPU. Even if interrupts get disabled or delayed, the hardware counter will happily continue to tick. The disadvantage is the additional effort to get the current value from the chip or timer.
What if I Need to Measure very Long Periods?
If you need to measure hours, days, months or even years, you should not use a real-time counter, but a dedicated real-time clock chip. Good RTC chips will keep the current time over many years with just a few seconds difference.
Also, RTC chips usually have one or two alarms you can set and connect to raise an interrupt or even wake up the MCU.
If long term stability is no issue, you can alternatively use a dedicated real-time clock with a very low precision like 1 second or even slower. With this precision, a 32bit value will have a maximum duration of 136 years, and you can easily measure time deltas of 68 years.
Conclusion
I hope this article gave you some insights on the topic of real-time counters and you got rid of fears about integer overflows. 😄
If you have questions, miss some information or have any feedback, feel free to add a comment below.
I created a readable, fully inline AES‑256/CBC implementation you can drop into C++ projects — handy for embedded systems. It avoids static S‑Boxes, needs only stdint/cstddef, and is MIT‑licensed on GitHub. If this sounds useful, read the full post for requirements, example code, and usage notes.
I wanted my winter decoration to switch on at dusk without constant adjustments, so I built a simple low-voltage controller using a P-channel MOSFET, a microcontroller and an ambient light sensor. I walk through my design choices, sealing for outdoor use and programming tips—read on if you'd like to build one too.
I use Autodesk EAGLE regularly and, while I appreciate parts of it, I ran into 12 recurring issues that waste time and hinder workflow. In this article I explain each problem and suggest improvements. If you use EAGLE, please read on — I hope it helps.
I just received the Adafruit PCB coaster and was pleasantly surprised—photos don't do it justice. Made from 2.4mm FR4 with a transparent solder mask and black silkscreen, it blends cold and copper tones nicely. Read on for my quick impressions and close-up photos.
I swapped my LM386 for an NXP TDA7052 to reduce distortion and gain more volume. The TDA7052 needs only power, an input and connects to an 8Ω speaker; I added a volume trimmer (I used 47k, 10k also works). Read the full post for the schematic and wiring details.
I've been making videos of my LED snowflake decorations, but they still fall short of the live sparkle and diffraction I see. I explain the problems—blinding LED peaks and weak diffraction spikes—and invite you to read the post to watch the clips and see my plan to add digital effects.