Flags play an important role in embedded software development. Microcontrollers and chips are using registers where single bits or combinations of bits play a big role in the configuration. All the bits and their role are described in the specification, but writing the bits directly in the code would be very confusing and hard to read:
AHBMASK.reg = 0x14 // Huh!?
For this reason it makes sense to write an interface to access the registers of a chip. This interface will define identifiers, in the form of constant values, to build bit combinations to write into the registers.
The Outdated and Bad Approach
Chip manufacturers are well known for their extremely bad and outdated interfaces to access chip registers. Let us have a look at the CMSIS implementation from Atmel. This is part of the interface to access registers in one of the microcontrollers. Please ignore the copyright block, it is just added for legal reasons.
/**
 * Copyright (c) 2015 Atmel Corporation. All rights reserved.
 * Redistribution and use in source and binary forms, with or without modification, are permitted provided that the following conditions are met:
 * 1. Redistributions of source code must retain the above copyright notice, this list of conditions and the following disclaimer.
 * 2. Redistributions in binary form must reproduce the above copyright notice, this list of conditions and the following disclaimer in the documentation and/or other materials provided with the distribution.
 * 3. The name of Atmel may not be used to endorse or promote products derived from this software without specific prior written permission.
 * 4. This software may only be redistributed and used in connection with an Atmel microcontroller product.
 * THIS SOFTWARE IS PROVIDED BY ATMEL "AS IS" AND ANY EXPRESS OR IMPLIED WARRANTIES, INCLUDING, BUT NOT LIMITED TO, THE IMPLIED WARRANTIES OF MERCHANTABILITY, FITNESS FOR A PARTICULAR PURPOSE AND NON-INFRINGEMENT ARE
 * EXPRESSLY AND SPECIFICALLY DISCLAIMED. IN NO EVENT SHALL ATMEL BE LIABLE FOR ANY DIRECT, INDIRECT, INCIDENTAL, SPECIAL, EXEMPLARY, OR CONSEQUENTIAL DAMAGES (INCLUDING, BUT NOT LIMITED TO, PROCUREMENT OF SUBSTITUTE GOODS
 * OR SERVICES; LOSS OF USE, DATA, OR PROFITS; OR BUSINESS INTERRUPTION) HOWEVER CAUSED AND ON ANY THEORY OF LIABILITY, WHETHER IN CONTRACT, STRICT LIABILITY, OR TORT (INCLUDING NEGLIGENCE OR OTHERWISE) ARISING IN
 * ANY WAY OUT OF THE USE OF THIS SOFTWARE, EVEN IF ADVISED OF THE POSSIBILITY OF SUCH DAMAGE.
 */
/* -------- PM_AHBMASK : (PM Offset: 0x14) (R/W 32) AHB Mask -------- */
#if !(defined(__ASSEMBLY__) || defined(__IAR_SYSTEMS_ASM__))
typedef union {
  struct {
    uint32_t HPB0_:1;          /*!< bit:      0  HPB0 AHB Clock Mask                */
    uint32_t HPB1_:1;          /*!< bit:      1  HPB1 AHB Clock Mask                */
    uint32_t HPB2_:1;          /*!< bit:      2  HPB2 AHB Clock Mask                */
    uint32_t DSU_:1;           /*!< bit:      3  DSU AHB Clock Mask                 */
    uint32_t NVMCTRL_:1;       /*!< bit:      4  NVMCTRL AHB Clock Mask             */
    uint32_t DMAC_:1;          /*!< bit:      5  DMAC AHB Clock Mask                */
    uint32_t USB_:1;           /*!< bit:      6  USB AHB Clock Mask                 */
    uint32_t :25;              /*!< bit:  7..31  Reserved                           */
  } bit;                       /*!< Structure used for bit  access                  */
  uint32_t reg;                /*!< Type      used for register access              */
} PM_AHBMASK_Type;
#endif /* !(defined(__ASSEMBLY__) || defined(__IAR_SYSTEMS_ASM__)) */

#define PM_AHBMASK_OFFSET           0x14         /**< \brief (PM_AHBMASK offset) AHB Mask */
#define PM_AHBMASK_RESETVALUE       0x0000007Ful /**< \brief (PM_AHBMASK reset_value) AHB Mask */

#define PM_AHBMASK_HPB0_Pos         0            /**< \brief (PM_AHBMASK) HPB0 AHB Clock Mask */
#define PM_AHBMASK_HPB0             (0x1ul << PM_AHBMASK_HPB0_Pos)
#define PM_AHBMASK_HPB1_Pos         1            /**< \brief (PM_AHBMASK) HPB1 AHB Clock Mask */
#define PM_AHBMASK_HPB1             (0x1ul << PM_AHBMASK_HPB1_Pos)
#define PM_AHBMASK_HPB2_Pos         2            /**< \brief (PM_AHBMASK) HPB2 AHB Clock Mask */
#define PM_AHBMASK_HPB2             (0x1ul << PM_AHBMASK_HPB2_Pos)
#define PM_AHBMASK_DSU_Pos          3            /**< \brief (PM_AHBMASK) DSU AHB Clock Mask */
#define PM_AHBMASK_DSU              (0x1ul << PM_AHBMASK_DSU_Pos)
#define PM_AHBMASK_NVMCTRL_Pos      4            /**< \brief (PM_AHBMASK) NVMCTRL AHB Clock Mask */
#define PM_AHBMASK_NVMCTRL          (0x1ul << PM_AHBMASK_NVMCTRL_Pos)
#define PM_AHBMASK_DMAC_Pos         5            /**< \brief (PM_AHBMASK) DMAC AHB Clock Mask */
#define PM_AHBMASK_DMAC             (0x1ul << PM_AHBMASK_DMAC_Pos)
#define PM_AHBMASK_USB_Pos          6            /**< \brief (PM_AHBMASK) USB AHB Clock Mask */
#define PM_AHBMASK_USB              (0x1ul << PM_AHBMASK_USB_Pos)
#define PM_AHBMASK_MASK             0x0000007Ful /**< \brief (PM_AHBMASK) MASK Register */
To be fair, CMSIS is a hardware abstraction layer standard defined by ARM. It shall standardise the software interfaces across all Cortex-M products. Therefore Atmel had no choice as to follow this standard.
Do you feel the dust on this code? There are a vast amount of problems caused by this interface.
First the values are defined as macros instead of constants. All this identifiers will clutter the global namespace of your code and make naming conflicts very likely. Way better would be using simple constants like this:
const uint8_t PM_AHBMASK_DSU_Pos = 3;
const uint32_t PM_AHBMASK_DSU = (0x1ul << PM_AHBMASK_DSU_Pos);
This would give the compiler the correct hint about the used data type for the registers. All this constants could be put into a own namespace to prevent any name collisions with the user code. It would still not prevent incorrect assignments.
I can write and compile the following code, which absolutely makes no sense:
CPUSEL.reg = PM_AHBMASK_DSU; // nonsense!
There will be not even a compiler warning about any problems and this is exactly what makes debugging embedded code very difficult.
Use the C++ Language!
I personally think, many software developers writing C++ code for hardware do not make fully use of the language. One reason could be the lack of support of many language features at the beginning or just the lack of experience.
In the the last 10 years, there was a huge progress in the development of the C++ language. Ignoring this progress would be silly in my opinion. Especially the C++11 standard added lots of useful features to the language.
A good support for the C++11, C++14 or even better for C++17 is very important, especially for embedded software development. Many of the introduced features will improve your code, make it simpler and more readable, without adding any additional byte to your firmware.
The features I describe in this article will not increase the size of the final firmware, they will just affect safety, readability and simplicity of your code. At the end, the optimiser in the compiler will resolve all the code and generate small and compact binaries.
Working with Flags
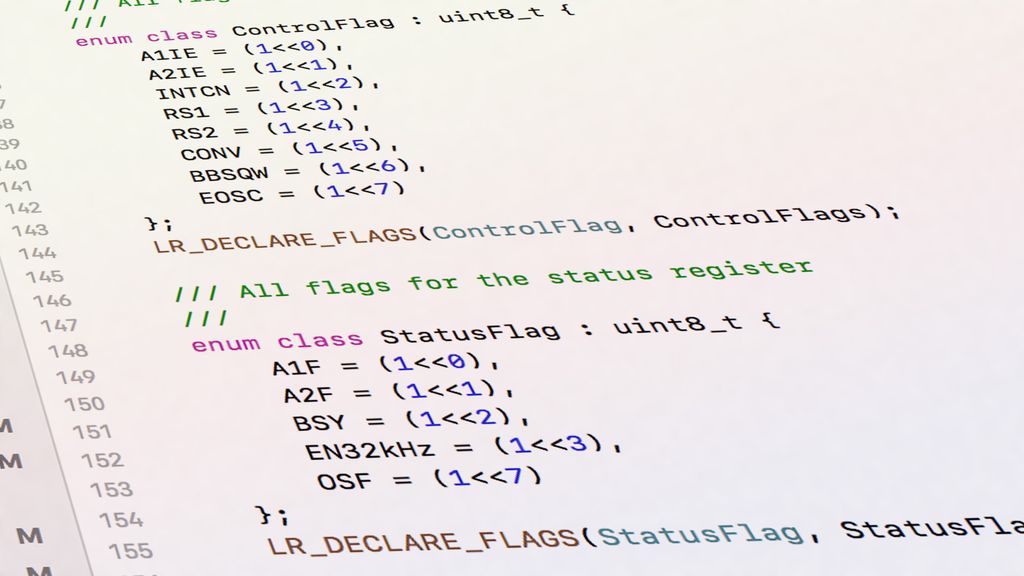
Let me start do demonstrate how you should work with flags in you code. First, flags shall be easily combined using the or | operator:
Chip::setMode(Mode::Enabled|Mode::Speed100kHz|Mode::Alternative);
In your implementation, you should be able to test for flags and convert combined flags into a bit mask.
void setMode(Modes modes)
{
    if (modes.isSet(Mode::Enabled)) {
        // ...
    }
    MODE_REG = modes;
}
The last requirement is to make everything type safe. This means, a flag e.g. from the enumeration A can not be used for the flags in B. This will prevent many typos and errors in your code.
Chip::setMode(Pin::Enabled); // ERROR!
Implementation
The implementation of this behaviour is very simple. First we need a simple template class to create a new type for the flags:
https://gist.github.com/LuckyResistor/6c31c7f2dad32c2d7114a811670bb0f6
Used Language Features
This code is using many language features from C++11. Therefore you have to make sure the compiler in your build chain supports this language version. This is already the case for the Arduino IDE any many other GCC based environments. Sometimes you have to add the -std=C++11 or even better -std=C++17 command line option to enable the latest language features.
Basic Required Features
- **The
header:** This header from the standard library defines the types This header from the standard library defines the types uint8_t or or int32_t` to declare variables of a defined size. The header should exist in every C++ environment. If your development environment does not support this header, you should switch to another one. to declare variables of a defined size. The header should exist in every C++ environment. If your development environment does not support this header, you should switch to another one. - Template class: Template classes working like regular classes, but certain parameters are defined at the point of use. Usually this parameters define types which are used for the class. The compiler will automatically generate a new class definition using this parameter at the point a template class is first used in the code. Template classes are an important feature of the C++ language and should be present in every development environment. Template classes working like regular classes, but certain parameters are defined at the point of use. Usually this parameters define types which are used for the class. The compiler will automatically generate a new class definition using this parameter at the point a template class is first used in the code. Template classes are an important feature of the C++ language and should be present in every development environment.
- The
inline specifier: This specifier is a simple hint to the compiler to use the code of a function directly, replacing the call. This is just a This specifier is a simple hint to the compiler to use the code of a function directly, replacing the call. This is just a hint.. - Namespaces: Especially for embedded code, Especially for embedded code, namespaces are a really great tool to keep your own types and variables in a own scope. They are also a nice tool to create logical modules without using singleton classes. are a really great tool to keep your own types and variables in a own scope. They are also a nice tool to create logical modules without using singleton classes.
Features from C++11
- Type Traits: The The
header defines a number of template classes which can be used in combination with header defines a number of template classes which can be used in combination with static_assert`, to check the type of parameters. It can also be used in template to conclude a type from a parameter., to check the type of parameters. It can also be used in template to conclude a type from a parameter. - The
noexcept specifier: It declares a function will never throw an exception. Exception are usually not used in embedded code, but this class can be universally used in desktop and embedded code. Marking functions not throwing exceptions will allow the compiler to generate better optimisations.: It declares a function will never throw an exception. Exception are usually not used in embedded code, but this class can be universally used in desktop and embedded code. Marking functions not throwing exceptions will allow the compiler to generate better optimisations. - The
constexpr specifier: It declares a function with a given input will always generate the same output. This will allow the compiler to evaluate a function at compile time. Marking the right methods with the specifier will not only reduce the size of the generated binary, it will also allow to use flag combinations as constants.: It declares a function with a given input will always generate the same output. This will allow the compiler to evaluate a function at compile time. Marking the right methods with the specifier will not only reduce the size of the generated binary, it will also allow to use flag combinations as constants. - The initialiser list feature: Using the : Using the
header allows creating a constructor using an initialiser list. This will allow to initialize flags with syntax like this: header allows creating a constructor using an initialiser list. This will allow to initialize flags with syntax like this: const Flags flags = {Flag::A, Flag::B, Flag::C};`
Simple Usage Example
See the following code of a driver for the TCA9548A chip as a very simple example. I removed all comments and some methods to demonstrate the usage.
https://gist.github.com/LuckyResistor/5f8285ee336b0d8eefb7d722e61f1cb8
This simple I2C multiplexer chip allows enabling any combination of the eight supported channels. Using the flags class, the usage of this interface is simple and safe. You easily enable one or more channels.
Working with the flags in the implementation is very simple.
https://gist.github.com/LuckyResistor/e55749d4948ac2aa8142f7668f9caa97
As you can see, you can work with the channels very similar as you would with any other bit mask. The difference is the type safety. It is not possible to accidentally mix bits from one flags type with another.
In line 38, you can also see how the flags type is implicitly converted into a bit mask. This is a one way operation. The flags can be converted into a bit mask, but an “anonymous” bit mask can not be converted automatically into a flags type.
Advanced Usage
You can not only use simple flags, where each bit is assigned to one enumeration value. Any combination of bits and masks is possible.
https://gist.github.com/LuckyResistor/6dc74a3fe63019a0e72ad25c3843e683
Conclusion
The flags template class will allow you to work with flags in a safe and comfortable way. The compiler will detect any potential problems where you use the wrong enumeration type for the flags.
If you have questions, miss some information or just have any feedback, feel free to add a comment below.
Have fun!